Posted: Wed Feb 05, 2014 6:17 pm
Most of my SIGs lately, I have been making from custom renders that are made from everyday photos found on the internet. Yes this takes a lot more time, but then the SIGs are unique and don't have the same generic renders that everyone else is using in other Groups/Clans on the web.
Here is another tutorial on how this is done, for those that are interested in getting involved with custom graphics, and also for those that just want to dabble!
1) Find a cool picture that you would like to use:

2) Layer image from the background, set background to transparent, and then start a crude/rough erasing of everything around image that you want as your render:

3) Use a smaller erasing tool and start refining the erasure of extraneous material getting closer to the main image as the tool will allow:

4) Zoom in as much as you need to do a detail erasure using the smallest erasing tool...get right down to the very edge of pixels of the main image:

5) Create a "Green" Layer to clean up image and get rid of any dark material you might have missed on the transparent background. Then DEFRINGE the entire image by 1 pixel:

6) Sharpen image:

7) Smooth out edges and do some minor tweaking of image to get it not to look jagged in any spots:

8) Make a black layer under the image to bring out any bright colored areas that need erased, darkened, or blended down:

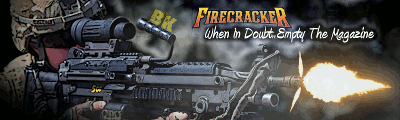
9) Finished Render - ready to use in a SIG or other graphic design:

Hopefully you enjoyed this brief tutorial, and might find it useful!
CHEERS!!!
Kula


Here is another tutorial on how this is done, for those that are interested in getting involved with custom graphics, and also for those that just want to dabble!
1) Find a cool picture that you would like to use:
2) Layer image from the background, set background to transparent, and then start a crude/rough erasing of everything around image that you want as your render:
3) Use a smaller erasing tool and start refining the erasure of extraneous material getting closer to the main image as the tool will allow:
4) Zoom in as much as you need to do a detail erasure using the smallest erasing tool...get right down to the very edge of pixels of the main image:
5) Create a "Green" Layer to clean up image and get rid of any dark material you might have missed on the transparent background. Then DEFRINGE the entire image by 1 pixel:
6) Sharpen image:
7) Smooth out edges and do some minor tweaking of image to get it not to look jagged in any spots:
8) Make a black layer under the image to bring out any bright colored areas that need erased, darkened, or blended down:
9) Finished Render - ready to use in a SIG or other graphic design:
Hopefully you enjoyed this brief tutorial, and might find it useful!
CHEERS!!!
Kula